

Last Updated: October 22, 2026
Quick Summary
To sharpen clipper blades at home, clean the blade thoroughly, then use 150-grit sandpaper followed by 240-grit sandpaper with light, even forward strokes on a flat surface. The entire process takes 10-15 minutes per blade and costs under $1 using basic sandpaper.
- Replace blades if they show visible chips, bends, rust, or still pull hair after sharpening twice
- Essential tools for home sharpening include 150-grit and 240-grit sandpaper, a flat surface, and cut-resistant gloves for safety
- Always sharpen in one direction only with light pressure; sawing back and forth creates a jagged, uneven edge
- Test sharpness using the paper test, marker test, light test, or fingernail test before reinstalling the blade
- Maintain sharpened blades by brushing out hair, applying clipper oil after every use, and deep cleaning weekly
Table of Contents
- When to Sharpen vs. When to Replace Clipper Blades
- What You'll Need to Sharpen Clipper Blades at Home
- How to Clean Clipper Blades Before Sharpening
- How to Sharpen Wahl Clipper Blades: Step-by-Step Process
- Clipper Blade Sharpening Cost and Budget Considerations
- Maintenance and Lubrication After Sharpening
- Common Mistakes to Avoid When Sharpening Clipper Blades
- Frequently Asked Questions
When to Sharpen vs. When to Replace Clipper Blades
Not every dull blade is worth the effort to sharpen clipper blades.
Sharpen your blades when:
- They've lost their edge but still cut without pulling hair
- The moving and stationary blades align properly
- There's no visible damage, chips, or corrosion
Replace your blades when:
- The teeth show visible chips or breaks
- The cutting edge is bent or warped beyond straightening
- There's rust or deep corrosion that won't clean off
A blade that still pulls hair after cleaning and sharpening needs replacement; sharpening a damaged blade risks damage to your clipper housing.
At Fade Supply Co, we recommend keeping replacement blades on hand so you're never without a sharp, reliable edge.

What You'll Need to Sharpen Clipper Blades at Home
Essential Sharpening Tools and Materials
Most home sharpening setups use simple, affordable tools.
For sandpaper sharpening:
- 150-grit sandpaper (removes wear and dullness)
- 240-grit sandpaper (refines the edge)
- A flat, clean surface (glass, tile, or a sharpening stone)
For grinding wheel sharpening:
- A bench grinder or rotary tool with a grinding wheel
- Silicon carbide wheels work best for blade steel
- Wheel speed should stay under 3,000 RPM to avoid overheating
For professional sharpening machines:
- Dedicated clipper blade sharpeners (if you sharpen frequently)
- These cost more but deliver consistent results
Most barbers start with sandpaper: it's cheap and portable.
Safety Equipment and Precautions
Clipper blades are sharp. Treat them with respect.
Wear these:
- Cut-resistant gloves or finger cots
- Safety glasses to keep debris out of your eyes
- An apron or work clothes you don't mind getting dirty
Work safely:
- Never grip the sharp edge with bare fingers; hold the blade by the spine only
- Work in a well-lit area so you can see the blade surface clearly
- Keep your workspace clean and organized
With a grinding wheel, tie back long hair, avoid loose sleeves, and keep fingers clear of the spinning wheel.
How to Clean Clipper Blades Before Sharpening
You cannot sharpen a dirty blade effectively. Cleaning comes first.
Removing Hair and Debris
Hair and dried product cling to the blade teeth and block sharpening.
Quick cleaning (between clients):
- Tap the blade gently against a hard surface to dislodge loose hair
- Use a soft brush to sweep hair away from the blade teeth
- Wipe the blade with a clean, dry cloth
Deep cleaning (before sharpening):
- Remove the blade from the clipper housing
- Hold it under warm running water and scrub between the teeth with an old toothbrush, paying attention to gaps where hair accumulates
- Rinse thoroughly until water runs clear
The Andis Blade Care Dip Jar washes away hair, buildup and preservatives that accumulate on clipper blades. It leaves blades clean, lubricated and cool for optimal use. It works as a lubricant, cleaner, coolant and rust preventative.

Deep Cleaning and Disinfection
Once hair is removed, disinfect the blade.
Disinfection process:
- Soak the blade in a disinfectant solution (Barbicide is the industry standard)
- Scrub with a soft brush while it soaks
- Rinse under clean running water
- Dry completely with a lint-free cloth before sharpening
A wet blade won't sharpen properly, so dry it completely first.
How to Sharpen Wahl Clipper Blades: Step-by-Step Process
Removing and Inspecting the Blade
Before you sharpen, remove the blade safely and check its condition. These steps apply to most detachable blades, including the Wahl-style blades many home sharpeners start with; the release mechanism varies by model, so check your manual.
Removing the blade:
- Unplug the clipper from the power outlet. Never rely on the switch alone.
- Press or slide the blade release button or lever on your model.
- Gently pull the blade away from the housing, holding it by the spine (the thick back edge), not the teeth.
- Set it on a clean, dry, lint-free cloth.
Inspecting the blade:
- Identify the moving (top, cutter) blade and the stationary (bottom, comb) blade.
- Check both for chips, bends, corrosion, or missing teeth under bright light.
- Run a fingernail, not a fingertip, lightly along the cutting edge to feel for nicks or a rolled edge.
- Look down the cutting edge against a light source; a straight, unbroken line means the edge is true, while a wavy or broken line signals damage.
- Note any gaps between the blades when seated together.
If the blade is cracked, severely bent, or missing teeth, replace it, sharpening cannot restore structural damage, and a compromised blade can grab or cut a client.
Selecting Your Sharpening Method
Three methods work for home sharpening, choose based on equipment, blade type, and comfort level.
Sandpaper method (easiest):
- Requires only sandpaper and a flat surface
- Takes 10-15 minutes per blade
- Best for occasional maintenance sharpening
Grinding wheel method (faster):
- Requires a bench grinder or rotary tool with a suitable wheel
- Takes 5-10 minutes per blade
- Removes material faster, so a slip is harder to undo
Professional sharpening service:
- You mail blades to a specialist, priced per blade, with turnaround of days to a couple of weeks
- Best for expensive blades, alignment problems, or blades you cannot afford to ruin
Most barbers use sandpaper for routine maintenance.
Executing Controlled Sharpening Strokes
Proper stroke control determines edge quality, and consistency beats force every time.
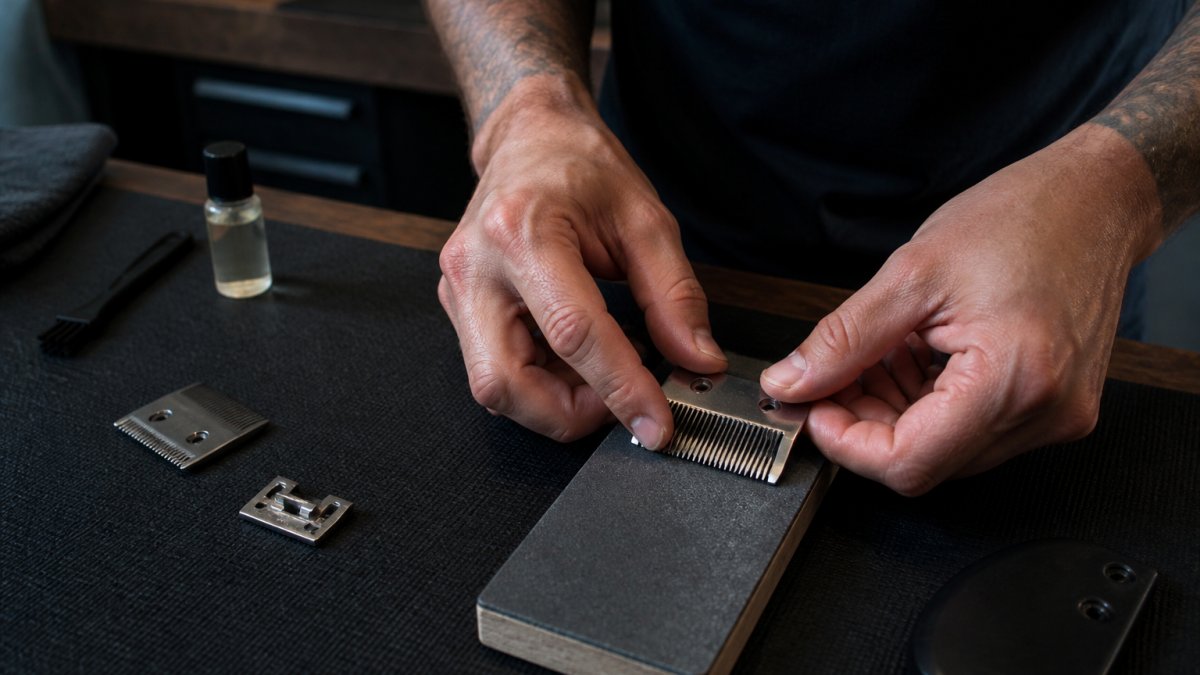
Using sandpaper:
- Place 150-grit sandpaper on a flat, clean surface such as glass, tile, or a sharpening stone. Tape the corners down so it cannot slide.
- Hold the blade by its spine, fingers clear of the teeth, and position the bevel of the cutting edge flat against the paper, the bevel, not the flat face, is what you are refining.
- Use light, even pressure and make forward strokes along the cutting edge in one direction only. Lift and return to the start rather than dragging back.
- Repeat 10-15 forward strokes with 150-grit, then switch to 240-grit and repeat 8-10 strokes.
- Wipe the blade clean between grit changes so loose abrasive does not contaminate the finer paper.
Key technique points:
- Keep even pressure through each stroke; rocking the blade rounds the edge.
- Move in one direction on each pass. Sawing back and forth creates an uneven, burred edge.
- Count strokes on each tooth or section so both ends get equal treatment.
Testing and Adjusting Blade Alignment
A sharp blade that is misaligned won't cut properly. Test and adjust before reinstalling using repeatable checks.
Objective sharpness checks:
- Paper test: Draw the blade edge across newspaper or receipt paper. A sharp edge slices cleanly; a dull edge tears or drags.
- Marker test: Re-mark the bevel and take one or two light strokes. Even marker removal across the full edge confirms consistent contact.
- Light test: Hold the edge against a light source. A uniform, unbroken reflection line indicates a true edge; a bright spot or break signals a nick or rolled section.
- Fingernail test: Drag a fingernail lightly across the edge. A sharp edge catches; a dull edge slides. Never use a fingertip.
Checking alignment:
- Seat the moving and stationary blades together as they would sit on the clipper.
- Look from the side: the blades should sit flush with no visible gap along the cutting line.
- Check that the teeth interleave evenly and the moving blade travels its full stroke without binding.
- Reinstall, run the clipper briefly, and listen for rattling or grinding that signals misalignment.
If alignment is off, the cause is often a bent blade, a worn tension spring, or a blade not seated correctly. Don't bend a blade back into shape unless you accept the risk of cracking it; a replacement is usually safer and cheaper.
Clipper Blade Sharpening Cost and Budget Considerations
Home sharpening costs almost nothing; professional sharpening costs more but saves time.
Home sharpening costs:
- Sandpaper: $3-5 for a pack that lasts months
- Cleaning supplies: already on hand (brush, cloth, water)
- Time investment: 15-20 minutes per blade
Professional sharpening costs:
- Typical price: $10-20 per blade
- Turnaround time: 5-14 business days
- Shipping costs: $5-10 each way (if mailing)
Blade replacement costs:
- Quality replacement blades: $25-40 each
- Supreme Trimmer replacement blades at Fade Supply Co: $29.99
- Lifespan: 3-6 months of regular use
Home sharpening saves money, but if you're sharpening multiple times per week, professional sharpening may be worth the cost for consistency.
Maintenance and Lubrication After Sharpening
A sharp blade that isn't maintained won't stay sharp for long. Maintenance after sharpening is four steps, cleaning, disinfecting, drying, and oiling, and skipping any one shortens blade life or creates a hygiene problem.
Cleaning vs. Disinfecting vs. Oiling
These aren't interchangeable, and order matters.
- Cleaning removes hair, skin, and product residue. It is physical removal, not germ kill.
- Disinfecting reduces pathogens on a blade that has already been cleaned. Disinfectant cannot penetrate hair and debris, so cleaning must come first.
- Drying matters because moisture left on steel promotes corrosion and dilutes the oil you apply next.
A common mistake is spraying disinfectant onto a hairy blade and calling it clean, the hair shields the metal.
After Every Use
- Brush hair out of the teeth with a soft brush while the blade is still dry; hair is easier to remove before it mixes with oil.
- Wipe the blade surfaces with a clean, dry cloth.
- Apply a thin coat of clipper oil to both blade surfaces and along the teeth line.
- Run the clipper for 5-10 seconds so the oil works into the contact area.
- Wipe away excess oil. Pooling oil attracts hair and dust.
Weekly and Deep Maintenance
- Remove the blade and deep clean it as described earlier in this guide.
- Disinfect according to the product label, then rinse if directed.
- Dry completely with a lint-free cloth. Do not reassemble a wet blade.
- Oil the blade and the clipper's blade drive area per the manufacturer's instructions.
- Run the clipper briefly and wipe off excess oil before the next use.
Long-Term Care and Storage
- Rotate blades. Keeping two or three sharp blades in rotation spreads wear and means you are never sharpening under pressure.
- Store dry and oiled. A light film of oil and a dry case prevent rust, especially in humid shops.
- Inspect before each install. A quick look for chips or bent teeth catches problems before they reach a client.
Lubrication reduces friction and heat, while cleaning and disinfection keep the blade hygienic, together they extend blade life and keep cuts smooth.

Common Mistakes to Avoid When Sharpening Clipper Blades
Learning what not to do saves time and prevents blade damage.
Mistake 1: Sharpening a dirty blade
- Dirt and hair prevent the sharpening surface from contacting the blade properly
- Always clean thoroughly before sharpening
Mistake 2: Using too much pressure
- Heavy pressure creates an uneven edge and can damage the blade
- Let the sandpaper or wheel do the work with light, consistent pressure
Mistake 3: Sharpening in both directions
- Sawing back and forth creates a jagged edge
- Always sharpen in one direction (forward strokes only)
Mistake 4: Overheating the blade with a grinding wheel
- High heat can warp the blade and ruin the temper of the steel
- Keep wheel speed low (under 3,000 RPM) and stop if the blade gets hot to the touch
Mistake 5: Ignoring blade alignment
- A sharp blade that's misaligned won't cut properly
- Check alignment after sharpening to avoid pulling and uneven cuts
Mistake 6: Waiting too long between sharpenings
- A blade that's extremely dull is harder to sharpen
- Sharpen regularly (every 2-4 weeks with heavy use); maintenance sharpening is easier than rescue sharpening
Mistake 7: Trying to sharpen a damaged blade
- Chips, bends, and corrosion cannot be fixed by sharpening
- Replace the blade instead; wasting time on a damaged blade costs you money
Keeping your clipper blades sharp is one of the simplest ways to improve your cuts and protect your reputation. A dull blade pulls hair, creates uneven lines, and frustrates both you and your clients.
The Fade Supply Maintenance Kit is everything a professional barber needs to keep their tools clean, lubricated, and performing at their best, all in one bundle.
Frequently Asked Questions
Can you sharpen hair clipper blades at home?
Yes, you can sharpen clipper blades at home using sandpaper, a sharpening stone, or a grinding wheel. The process requires proper technique and the right tools to maintain blade alignment and prevent heat damage. Most barbers find that home sharpening works well for routine maintenance between professional services. Start with 150-grit or 240-grit sandpaper and use light, controlled strokes along the cutting surfaces.
How much does it cost to get hair clippers sharpened?
Professional sharpening services typically cost $15-$40 per blade, depending on your location and the service provider. Home sharpening requires an initial investment in tools (sandpaper, stones, or a sharpening machine) ranging from $10-$50, but this becomes cost-effective after a few uses. The Fade Supply Maintenance Kit ($29.99) includes Andis Clipper Oil 4 oz., Andis Cool Care 15.5 oz., and Barbicide Disinfectant, which are everything a professional barber needs to keep their tools clean, lubricated, and performing at their best.
How do you know if clipper blades need sharpening?
Inspect your blades visually for wear, nicks, or dull spots on the cutting surfaces. Test sharpness by running the blade across your thumbnail at a slight angle, a sharp blade should catch slightly without sliding smoothly. If clippers pull hair, skip or snag during cuts, or require extra pressure to cut cleanly, your blades need sharpening. Regular inspection after every 8-10 hours of use helps catch dull blades before they affect your cutting performance.
What tools do you need to sharpen clipper blades?
You'll need sandpaper (150-grit and 240-grit), a sharpening stone or grinding wheel, a cleaning brush, and clipper oil for lubrication. Optional tools include a magnifying glass for inspecting blade damage and a blade alignment tool. The Fade Supply Maintenance Kit includes Andis Clipper Oil 4 oz., Andis Cool Care 15.5 oz., and Barbicide Disinfectant, which are everything a professional barber needs to keep their tools clean, lubricated, and performing at their best. Wear safety glasses and work gloves to protect your hands and eyes from metal particles and sharp blade edges.
