

Table of Contents
- What Zero-Gapping Does for Sharp Lines
- Clippers vs. Trimmers: Which Blade You Can Zero Gap
- Best Tools for Zero-Gapping Clippers
- Step-by-Step: How to Align Clipper Blades
- How to Zero Gap a Trimmer and Test It Safely
- Clipper Blade Maintenance After Adjustment
- Frequently Asked Questions
Last Updated: October 17, 2026
What Zero-Gapping Does for Sharp Lines
Zero gap clippers means setting the moving blade so its teeth sit flush with the stationary blade, leaving no visible gap between the tips. That single adjustment is the difference between a crisp line and a fuzzy one.
Most barbers learn this by feel, which leaves you guessing when a line comes out ragged. Understanding what the gap actually does makes the adjustment repeatable.
How a Closed Gap Changes the Cut
A closed gap moves the cutting edge closer to the skin, so the blade tips meet the hair sooner, the cut lands lower, and the line looks tighter.
The trade-off is real. A zero-gap blade removes more hair with less pressure but leaves almost no margin for error. Push too hard and you get irritation, nicks, or a line that digs past the natural hairline, so pair the adjustment with a light hand.
Three things change when you close the gap:
- Line definition improves. The blade cuts at the skin line instead of slightly above it.
- Passes drop. You need fewer strokes to get a clean lineup, which means less friction on the client's skin.
- Control matters more. A tight blade follows your hand exactly, so sloppy angles show up immediately.
Clippers vs. Trimmers: Which Blade You Can Zero Gap
Trimmers are the tool built for zero-gapping. Clippers usually are not. That distinction saves a lot of ruined blades, but the reason behind it matters more than the rule.
A clipper uses a wide blade with a large cutting surface and a coarse tooth pattern, designed to move bulk hair, with a fixed amount of play between cutter and guard.
A trimmer uses a narrow T-blade or detail blade with fine teeth, and these assemblies are built to be adjustable.
| Tool Type | Blade Style | Zero-Gap Adjustable | Best Use |
|---|---|---|---|
| Clipper | Wide, coarse teeth | Rarely | Bulk removal, fades |
| Trimmer | Narrow T-blade, fine teeth | Usually | Lineups, edging, detailing |
| Detailer | Extra-narrow T-blade | Yes, with set tool | Tight spaces, hairline work |
Blade Geometry: Why Some Assemblies Adjust and Others Do Not
The adjustable part is not the blade itself but the relationship between the cutter (the moving toothed blade) and the guard (the stationary toothed blade).
Three geometry factors decide whether a blade can be zero-gapped:
- Tooth pitch. Fine teeth on a narrow blade leave room for the cutter to sit flush without the teeth interlocking. Coarse teeth on a wide blade need clearance to avoid collision.
- Cutter-to-guard overlap. Adjustable assemblies are designed with a small designed overlap so the cutter can travel past the guard tips. Fixed assemblies stop short of that overlap.
- Mount type. Slotted screw mounts adjust. Pinned or pocketed mounts do not.
A quick visual check tells you which you have. Look at the back of the blade assembly with the tool off. If you see two small screws passing through slots rather than round holes, the blade is adjustable.
Which Specific Assemblies Are Adjustable
Most professional trimmer T-blades are adjustable, including standard-tooth and deep-tooth variants, and detailers with extra-narrow T-blades almost always are because they are built for hairline work.
If you are shopping for a trimmer specifically to zero-gap, look for language like "zero-gap adjustable" or "adjustable T-blade" in the spec sheet. A blade described only as "precision" or "sharp" is not necessarily adjustable.
Best Tools for Zero-Gapping Clippers
The best tools for zero gap clippers are a small flathead or Phillips screwdriver that matches your blade screws, a fine-grit sharpening stone or sandpaper for flattening burs, a stiff brush, light clipper oil, and a bright work lamp so you can actually see the gap.
Here is what we would put on the bench before starting:
- Screwdriver set. Match the driver to the screw head exactly. A loose fit strips the slot.
- Fine-grit sandpaper or a flat stone. For knocking down burrs on the blade tips.
- A stiff cleaning brush. Loose hair under the blade throws off your alignment.
The trimmer you adjust matters as much as the tools. The BaBylissPRO COREFX Trimmer (FX76) uses a stainless-steel standard-tooth T-blade that is zero-gap adjustable, with a 6,800 RPM motor and a 1.5-hour cordless runtime. The Wahl 5 Star A·LIGN Cordless Trimmer pairs a slim, narrow T-blade with a zero-gap adjustable high-carbon steel cutting blade and a quiet 7,000 RPM motor.


Step-by-Step: How to Align Clipper Blades
Aligning clipper blades takes about five minutes. The goal: the moving blade's teeth should sit just behind the stationary blade's teeth, tips even and no gap between them.
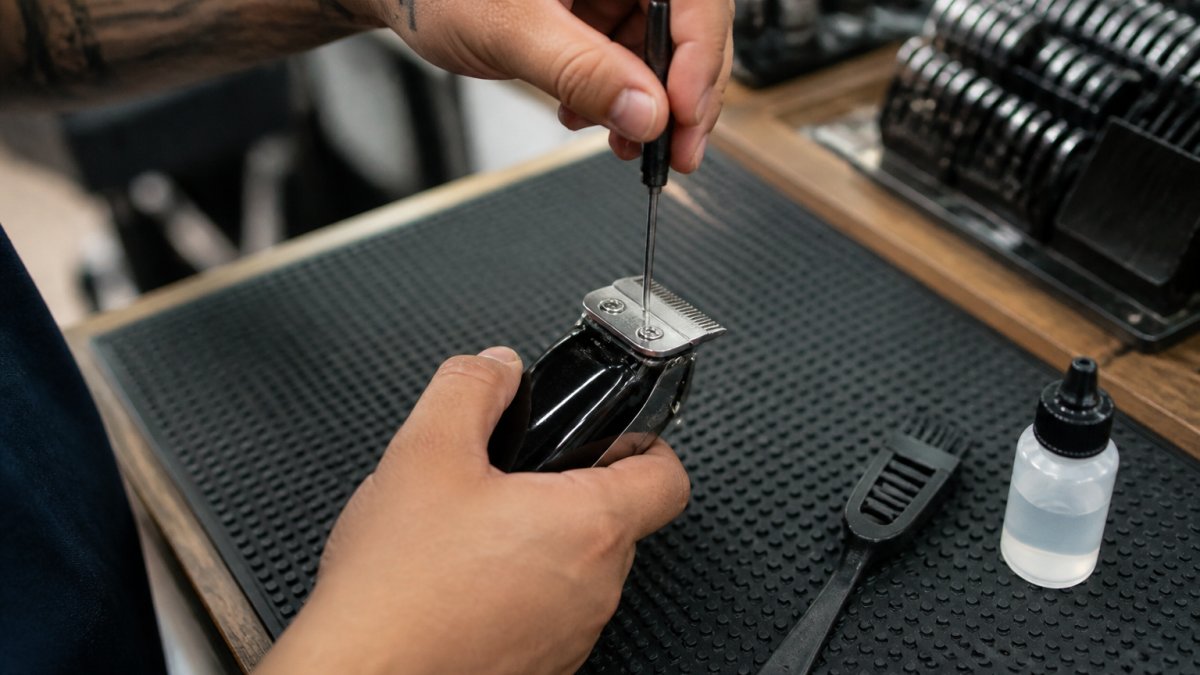
Loosen, Shift, and Check the Gap
Work through these steps in order. Do not skip the cleaning step, and do not overtighten anything.
BaBylissPRO® COREFX Trimmer (FX76) →
- Power off and unplug. Remove the battery if your tool allows it. This is not optional.
- Clean the blade first. Brush out hair and wipe the teeth. Hair trapped under the blade pushes it out of alignment.
- Find the adjustment screws. Most trimmers use two small screws holding the blade assembly. Some use a single set screw.
- Loosen, do not remove. Turn each screw about a quarter to half turn. The blade should shift with light finger pressure.
- Slide the moving blade forward. Push it toward the stationary blade until the teeth nearly touch.
- Set the gap. Aim for the moving blade's tips to sit flush with, or a hair behind, the stationary tips. No visible daylight between them.
- Tighten evenly. Alternate between screws so the blade does not cock sideways. Snug, not cranked down.
- Oil and run it. A drop of clipper oil, then power on for a few seconds. Listen for a clean hum with no rattle or grinding.
Close-Up Alignment Checks Most Guides Skip
A gap that looks closed from the front can still be misaligned in three ways that show up as track marks, pulling, or uneven lineups. Check each under a bright lamp before testing on skin.
- Parallelism check. Look straight down at the tooth rows from above. The tips of the moving blade should form a line parallel to the tips of the stationary blade. If one side sits forward, the cutter is cocked in its slot. Loosen both screws, reseat the cutter square, and retighten evenly.
- Side-to-side tracking check. With the tool off, push the cutter gently left and right with a fingertip. It should have a small, even amount of play on both sides. If it moves freely one way and binds the other, the mount is not seated in its slot.
- Overlap check. Look at the point where the cutter teeth pass the guard teeth. You want the cutter tips to sit flush or a hair behind the guard tips, with the cutter teeth centered between the guard teeth. If the cutter rides proud of the guard, the blade will scratch. If it sits too far back, the blade will leave stubble.
Reading the Gap Without a Finger Test
A finger test catches burrs and steps but not whether the gap is even across the tooth row. Two low-risk checks catch what touch misses:
- Light-gap check. Hold the tool under a bright lamp and tilt it until light passes between the cutter and guard. A correct zero gap shows an even hairline of light across the row, or none at all. A wedge of light on one side means the blade is cocked.
- Paper-drag check. Slide a strip of paper between the cutter and guard with the tool off. It should drag evenly across the full width. If it slides freely on one side and binds on the other, the gap is uneven.
Both checks are safer than pressing a fingertip against a blade that may have a burr, and both catch misalignment a quick glance misses.
How to Zero Gap a Trimmer and Test It Safely
Testing is where most barbers rush. A blade that looks perfect under a lamp can still scratch a client, so test it before it touches skin.
Start with the tool off. Run the flat of your thumb across the blade tips. Any burr or high tooth will catch. If it does, run the blade edge lightly across fine sandpaper on a flat surface to knock the burr down, then recheck.
Next, power on and test on your forearm. Move the blade across a small patch of hair with light pressure. Watch for three things:
- Pulling. If the blade grabs hair instead of cutting it, the gap is too tight or the teeth are misaligned.
- Scratching. A dragging sensation means a burr or a blade sitting too proud.
- Heat. A blade that warms up fast is running too tight against the stationary blade.
Reversing a Bad Adjustment
A bad zero-gap adjustment is fixable. Loosen both screws and slide the moving blade back a fraction, leaving a sliver of daylight between the tips roughly the thickness of a sheet of paper.
If the blade still pulls after backing off the gap, the problem is usually alignment, not gap.
If the teeth are visibly damaged or chipped, stop. No adjustment fixes a bent blade. Replace it.
Clipper Blade Maintenance After Adjustment
Clipper blade maintenance after a zero-gap adjustment is mostly about keeping the blade clean and oiled.
Build these into your end-of-day routine:
- Brush hair out of the teeth after every client
- Wipe the blade with a clean cloth and a drop of oil
- Check the gap weekly with a visual inspection under bright light
The cleaning and oil routine matters more on a zero-gapped blade because there is less room for hair to escape.
For barbers running several tools, a consistent maintenance schedule keeps every station ready. The BaBylissPRO GoldFX+ Outlining Cordless Trimmer FX787NG pairs a zero-gap adjustable standard-tooth T-blade with a DLC and titanium coating built for lower blade temperature and longer wear. The Wahl Professional Cordless Gold Detailer Li Trimmer offers zero-gap capability through its Pro-Set tool on a titanium and DLC coated T-wide blade.

Whichever tool you run, the principle holds: clean it, oil it, check the gap, and replace worn blades before they cost you a client.
Frequently Asked Questions
Can every clipper or trimmer be zero-gapped?
No. Zero-gapping only works on tools with adjustable blade screws and a movable cutting blade, which most professional trimmers and detachable clipper blades have. Many consumer clippers and sealed blade assemblies cannot be adjusted, and forcing them risks stripping the screws or damaging the blade. Check your manual or the blade type before you start. If the blade has no adjustment screws, leave it as is and use a trimmer built for zero-gap work instead.
How do you test zero-gapped clippers before using them on a client?
Run the clipper for a few seconds and listen for rattling or a high-pitched whine, which signals the blades are too tight. Then brush the blade lightly against your forearm or a piece of paper to check for scratching or pulling. If the blade grabs skin or leaves scratch marks, back the screws off a quarter turn. Only after a clean, smooth pass should you take zero gap clippers to a client's hairline.
Can zero-gapped clippers cause cuts or skin irritation?
Yes, if the gap is set too tight or the blade edges are damaged. A true zero gap brings the blade tips flush, so any burr or misalignment will catch skin. Keep the blade clean and oiled, test on your own arm first, and avoid pressing hard along the hairline. Barbers with sensitive clients should keep a second trimmer at a slightly open gap for fades and detail work near the ears and neck.
How many mm is a zero guard?
A zero guard, or zero-gapped blade with no guard attached, cuts to roughly 0.5 mm or less, which is why it reads as a skin-tight line. That is different from a #0 guard, which leaves about 1.5 mm of hair. Zero-gapping does not change the guard number, it just brings the blade tips closer together so the cut looks sharper. Use it for line-ups and edging, not for bulk removal.
Sharp lines come down to a blade that is set right and maintained well. If your current trimmer will not hold a zero gap, or the teeth are worn past saving, it is time for a tool that will. Fade Supply Co stocks professional-grade trimmers built for daily shop use, selected from real experience behind the chair and shipped fast so your station stays ready. Browse the collection and find the trimmer that earns its place on your bench.