

Table of Contents
- What You'll Need: Essential Barber Tools for Beginners
- Drop Fade vs Taper Fade: Know the Difference
- Step 1: Set the Initial Guideline for Your Drop Fade
- Step 2: Create the Bald Line and Drop the Arc
- Step 3: How to Blend a Fade for Beginners Using Clipper Guards
- Step 4: Remove Weight Lines and Detail the Drop Fade
- Common Drop Fade Mistakes and How to Fix Them
- Final Thoughts
- Frequently Asked Questions
Last Updated: September 6, 2026
A drop fade is a haircut style where the faded hairline dips down behind the ear and curves toward the nape, creating a distinct drop shape. Learning how to do a drop fade for beginners starts with understanding that this technique is less about speed and more about methodical sectioning and guard changes.
The most common mistake beginners make is rushing the transition. A successful drop fade depends on building a smooth gradient from skin to longer hair without visible lines.
What You'll Need: Essential Barber Tools for Beginners
The Clipper: Your Primary Blending Tool
Your clipper is the workhorse of the fade. For a drop fade, you need a clipper with two non-negotiable features: a detachable blade system and a lever (also called a taper lever or adjustment lever).
The lever adjusts the blade from 'open' (cutting longer) to 'closed' (cutting shorter) without changing the guard, giving you micro-adjustments between guard sizes. For example, a #1 guard with the lever open cuts at roughly 1/8 inch, but with the lever closed, it cuts closer to 1/16 inch (wahlusa.com). This half-guard range is where the actual blending happens.
Detachable blades matter because they allow you to zero-gap the clipper, setting the moving blade so it sits perfectly flush with the stationary blade. This is essential for creating a crisp bald line without switching to a trimmer for every detail pass. Fixed-blade clippers cannot be zero-gapped, which limits your ability to get a skin-tight line.
What to look for: A clipper with a metal blade drive (not plastic) for consistent power, and a lever that clicks into place at multiple stops rather than just open/closed. Popular professional choices include the Wahl Senior or Magic Clip for corded use, or the Gamma+ X-Ergo for cordless flexibility.
The Trimmer: For the Bald Line and Detailing
A trimmer is not a smaller clipper; it is a precision instrument for the skin line. You will use it to set the initial bald line, clean up the c-cup behind the ear, and detail the neckline. A narrower blade (like a 1/4-inch or 1/2-inch) gives you more control around the ear's curvature.
What to look for: A trimmer with a zero-gap adjustable blade. Most professional trimmers (like the Andis Slimline Pro Li or the BabylissPro GoldFX) come with a zero-gap screw that lets you align the blades perfectly. You also want a trimmer that runs at high speed (at least 6,000 RPM) to cut through dense hair without pulling (andis.com).
The Fade Brush: Your Second Set of Eyes
A dedicated fade brush is not an accessory, it is a diagnostic tool. After each guard pass, you need to clear away loose hair to see the weight lines (the dark bands where one guard's cut meets the next). A brush with firm, densely packed bristles flicks hair off the scalp without disturbing the fade.
What to look for: A brush with a curved or angled handle that lets you hold it like a pencil. The Percu Premium Black Fade Brush is designed with this ergonomic grip in mind, allowing you to brush and cut in the same motion. Avoid brushes with rubber cushions, as they absorb the flicking motion and reduce control.

The Comb: For Clipper-Over-Comb Blending
You need two combs: a wide-tooth comb for general sectioning and a fine-tooth fade comb for the clipper-over-comb technique. The fade comb should be flat-backed, not curved, so it sits flush against the scalp and provides a stable cutting surface. A metal or carbon-fiber comb is preferable to plastic because it does not flex under pressure, which would cause uneven cutting.

Optional But Recommended: The Half-Guard Set
Standard clipper guard sets jump from #0 (no guard) to #1 (1/8 inch) to #2 (1/4 inch). That 1/8-inch jump is too large for a smooth gradient. A half-guard set (like the Wahl Premium Guard Set) includes #0.5 (1/16 inch) and #1.5 (3/16 inch) guards, giving you intermediate steps. If you do not have half-guards, you can achieve the same effect by using your lever, open the lever fully on a #1 guard for a #0.5 equivalent, or close it halfway on a #2 for a #1.5 equivalent.
The Setup Checklist
Before the client sits down, confirm you have:
- Clipper with adjustable lever and detachable blades
- Trimmer with zero-gap adjustment
- Fade brush with firm bristles
- Flat-backed fade comb
- Full guard set (including half-guards if available)
- Clipper oil and a cleaning brush
- A second mirror to check the back of the head
Drop Fade vs Taper Fade: Know the Difference
The drop fade is often confused with the taper fade, but they are distinct cuts. A taper fade recedes straight down the sides and around the ears, while a drop fade arcs backward behind the ear and descends into the neckline.
This drop creates a more dramatic, angled silhouette that accentuates the occipital bone and adds shape to the back of the head. For beginners, the drop fade requires more attention to the curve, but the fundamental blending mechanics are the same.
Step 1: Set the Initial Guideline for Your Drop Fade
Begin by determining the drop fade's lowest point, which sits just behind the ear. Establish your initial guideline with the clippers closed and no guard, creating a line that starts at the temple and curves down and back toward the nape.
Keep the clipper's blade flat against the scalp to avoid digging in. Your goal here is a visible line of demarcation that marks where the skin fade will end.
Step 2: Create the Bald Line and Drop the Arc
With your trimmer, refine the guideline into a clean bald line. The arc should dip lowest behind the ear and then travel down the back of the neck, creating a subtle "C" shape that follows the head's natural contour.
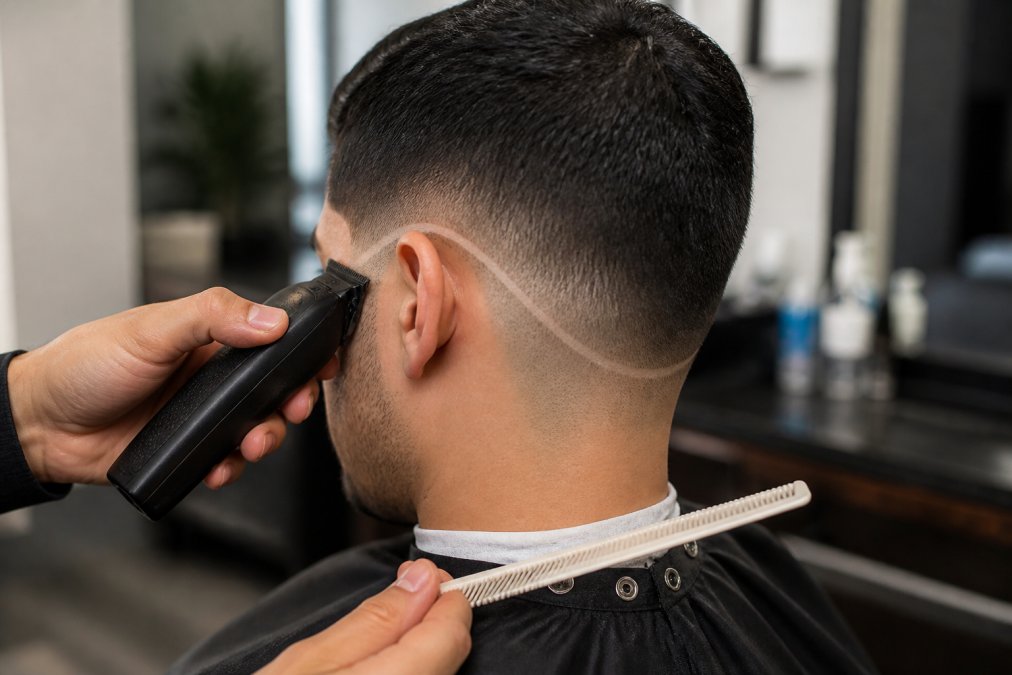
Work slowly and check your symmetry from the front and back. A common error is making one side lower than the other. Use your comb to lift the hair above the line and confirm you have a crisp, even curve before moving on.
Step 3: How to Blend a Fade for Beginners Using Clipper Guards
How to blend a fade for beginners starts with the half-guard technique. After establishing the bald line, attach your smallest guard, typically a #1, and open the lever fully. Begin cutting just above the bald line, using a flicking motion as you move the clipper upward and outward.
This flicking motion feathers the hair and creates the gradient. Work your way up through the guards, moving from the #1 to the #2, and then to the #3, each time overlapping your previous work by about half an inch. Keep the lever open for a softer blend and close it only when you need to remove more weight.
Step 4: Remove Weight Lines and Detail the Drop Fade
After the guard work, you will likely see visible weight lines where each guard stopped. Remove these by using the clipper-over-comb technique with your fade comb. Hold the comb flat against the head and run the clipper over it to knock down any dark spots or lines.
For the corners and the c-cup area behind the ear, use your trimmer to clean up any stray hairs and ensure the transition is seamless. Corner blending requires you to angle the trimmer slightly to soften the edge where the bald line meets the faded hair. Finish by detailing the neckline and cleaning up the edges around the ears with your trimmer.
Common Drop Fade Mistakes and How to Fix Them
Even with a steady hand, fades go wrong. The difference between a beginner who improves and one who plateaus is how they diagnose the problem. Here is a fix-it guide for the most common failures.
Mistake 1: Patchy Fades on Coarse or Curly Hair
Most tutorials assume straight hair. Coarse, curly, or coily hair reflects light differently and hides the gradient. The issue is that curly hair lies flat against the scalp in some areas and stands up in others, so a single guard pass removes uneven amounts of hair.
The fix: Before you start, identify the hair's natural growth pattern and parting. Cut with the grain (in the direction the hair lies) for the initial guard passes. For the final blend, go against the grain only in small, controlled sections, never in long sweeps. Use a #0.5 guard with the lever half-closed to knock down the 'shadow' that curly hair creates at the transition point. If you see a dark patch after blending, do not reach for a lower guard. Instead, use your trimmer with the blade slightly open to 'pencil' into the patch, removing hair in short, feathering strokes.
Mistake 2: The 'Stair-Step' Line Behind the Ear
The drop fade's signature arc is also its most fragile point. A common error is creating a line that steps down in two distinct levels instead of one continuous curve. This happens when you set the bald line in segments, first the temple, then the back, without connecting them visually.
The fix: After you set the initial guideline, step back and look at the head from the side profile. The arc should be a single, unbroken 'C' shape from the temple to the nape. If you see a corner where two segments meet, do not try to blend it with a guard. Re-establish the line with your trimmer, starting at the highest point of the arc and following the skull's contour in one continuous motion. Use your non-dominant hand to pull the ear down and out of the way; this reveals the true curve of the bone behind the ear.
Mistake 3: Accidental Bald Spots from Over-Flicking
The flicking motion used to blend guards is essential, but beginners often flick too aggressively, lifting the clipper away from the head at too sharp an angle. This scoops out a divot of hair, creating a visible bald spot that is nearly impossible to fix without starting over.
The fix: The flick should be a subtle wrist rotation, not a scoop. The clipper teeth should remain almost parallel to the scalp, lifting only about 15 degrees at the end of the stroke. If you do create a divot, resist the urge to chase it with a smaller guard. Instead, use the clipper-over-comb technique to pull hair from the surrounding area over the spot, then blend the edges with an open lever.
Mistake 4: Ignoring the 'C-Cup' Transition
The area directly behind the ear, the c-cup, is where the drop fade meets the sideburn and the nape. Beginners often blend the sides and the back separately, leaving a visible hinge point where the two zones meet.
The fix: Treat the c-cup as its own blending zone. After you finish the sides and the back, go back with your trimmer (no guard, blade closed) and soften the corner where the bald line curves upward. Use short, diagonal strokes that follow the angle of the jaw.
Mistake 5: Forgetting the Crown's Growth Pattern
The crown is a whorl where hair grows in a spiral (peer-reviewed research). Cutting it in a straight line, as you would on the sides, will leave a stubborn dark spot that resists blending.
The fix: When you reach the crown with your #2 and #3 guards, change your cutting direction to follow the spiral. Work in small radial sections, moving the clipper outward from the center of the whorl. This is not about removing more hair; it is about cutting each strand at the same relative angle so the fade reads as smooth. If the crown is particularly dense, use a #1.5 guard (if available) or close the lever halfway on your #2 guard to bridge the gap between the #1 and #2 steps.
The Tool Maintenance Angle Beginners Miss
A fade is only as clean as your blades. Dull clipper blades do not cut hair; they crush it, leaving jagged edges that show up as dark lines no matter how careful your guard progression is. Zero-gapping, setting the moving blade so it sits flush with the stationary blade, is critical for the bald line.
Check your blades before every cut. Run the clipper over a piece of thin paper; if it tears rather than slices cleanly, the blades need sharpening or replacement. Oil the blades with a lightweight clipper oil before each use, and clean out hair buildup between cuts with a brush and a blast of compressed air.
Final Thoughts
Mastering how to do a drop fade for beginners takes repetition and a willingness to troubleshoot your own work. Focus on clean guidelines, methodical guard progression, and thorough detailing.
The right tools make the learning process smoother. Fade Supply Co offers dependable, professional-grade clippers and station essentials selected from real-world experience behind the chair, with quick shipping to keep your station stocked. Get started with Fade Supply Co.
Frequently Asked Questions
What is the difference between a drop fade and a regular fade?
A regular fade follows the natural curve of the head, staying relatively level around the ears. A drop fade drops down behind the ear, creating a curved arc that dips lower toward the nape of the neck. This gives the haircut a more dramatic, defined shape and is a key detail that sets the drop fade apart from other fade styles.
What tools do I need to perform a professional drop fade?
You need a reliable set of clippers with a lever, a set of clipper guards, a trimmer for the bald guideline, and a sturdy comb for clipper-over-comb blending. A dedicated fade brush, like the Percu Premium Black Fade Brush, is also useful for brushing away loose hair to see your guideline clearly as you work.
How do you blend the transition line without leaving harsh marks?
The key is to work in small sections using the corner of the clipper blade with a flicking motion. Start with the lever open to cut the longer hair above the line, then close the lever and use a lighter flicking motion to knock down the weight line. Patience and overlapping your guards by half a size will create a smooth, even gradient.
How long does it take to learn a proper drop fade?
Most barbers need several months of consistent practice to master a clean drop fade. The technique itself, including setting the guideline and blending, can take 30 to 45 minutes per client as a beginner. Focus on learning the correct head shape and reference points, and your speed will naturally improve with repetition.